FaxTalk has the ability to transfer an incoming call to another phone number after the call is answered, after a voice message is played, or after a specific mailbox is selected by the caller. These options are available in the mailbox options of the Voice Messaging setting (available only in FaxTalk Messenger Pro and FaxTalk Multiline Server).
The software can perform a call transfer if your phone company or PBX phone system provides what is known as a “blind flash hook” transfer capability. This is different from a traditional three-way calling feature. In most cases, you cannot use three-way calling to perform a transfer to a phone number.
Most fax/voice modems will have the capability to initiate a “blind flash hook“, but the actual transfer capability is provided by a telephone service provider or local PBX style phone system and not just an individual telephone. You should check with your telephone service provider to see if a “blind flash hook” transfer capability is offered.
Some telephone service providers may not refer to the feature as “blind flash hook” transfer. When describing the requirement to the telephone service provider the question that needs to be answered is are you able to receive a phone call manually then press the telephone flash hook (or a flash button if the phone has one) and then get a dial tone, dial another number and hang up and have the original caller be able to speaker with the person you dialed.
If the phone company allows that to occur without requiring you to stay on the line during the call then you should be able to use FaxTalk to perform a transfer to a phone number.
Manually testing your phone line to see if “Blind flash hook” service is available.
Manually answer an incoming call. If you have a cell phone or another phone line, you can call the number you want to test and answer it.
Press the ‘Flash Hook’ or ‘Flash’ button on the phone you just answered. The incoming call should now be on hold and you should hear a ‘dial tone’.
Dial the number the caller will be forwarded to, wait a few seconds for it to dial and then hang up.
The incoming caller should now be transferred to the forwarded number.
During the installation of FaxTalk FaxCenter Pro, FaxTalk Messenger Pro or FaxTalk Multiline Server you may encounter an error message while the program is installing. This error indicates the installation program could not stop, modify, or install the FaxTalk service due to insufficient privileges of the logged on user. When installing FaxTalk you must be logged in as an Administrator, or logged in with an account that has administrator privileges, before beginning the installation of FaxTalk.
Some installation tasks require administrator privileges to complete successfully and failing to log in with administrator privileges will result in an unsuccessful installation. This requirement is only necessary for the installation. Once installed, FaxTalk will be available to non-administrative users who have rights to read and write to the Windows Registry (such as Power users).
You should restart the installation with Administrator privileges. To do this, right-click the installation (.exe) file and click “Run As Administrator” or contact your system administrator to install the software for you.
On July 31st, 2018 HP announced they were offering up to $10,000 bug-bounty in partnership with a crowd sourcing security site Bugcrowd.com. It’s now become public that back in May 2018, a major security flaw was found in many HP All-in-one fax/printers using ink jet technology. CheckPoint Research reported the fax exploit to HP in early May and to the public on August 12th. It’s unknown if CheckPoint’s revealing of this fax exploit was the primary reason why HP decided to participate in the first ever ‘printer’ related security crowd sourcing bounty on July 31st. After further research and testing by HP, the fax exploit was patched via a firmware update released on August 1st, 2018.
The ‘faxploit’ reported by CheckPoint allows an attacker to send a payload by sending a full-color fax to the victims HP All-in-one ink jet fax/printer. The image file with embedded payload is then saved to the printers memory in jpeg format without sanitation, causing a stack-based buffer overflow and allowing remote code execution. The attacker can now program the fax printer to perform other tasks. If the device is connected to your network, it’s possible to infect connected machines with malware.
When we started our research, our goal was to show that the fax machine, which is now mostly embedded in all-in-one printers, poses a security risk that was yet to be considered by the research community. In our research we presented the ITU T.30 fax protocol, including some of its extensions, such as Annex E that defines how to send colourful faxes. These protocols, defined in the 90s, use complex state machines, complicated compressions and several hard to implement extensions.
Using the HP Officejet Pro 6830 all-in-one printer as a test case, we were able to demonstrate the security risk that lies in a modern implementation of the fax protocol. Using nothing but a phone line, we were able to send a fax that could take full control over the printer, and later spread our payload inside the computer network accessible to the printer.
We believe that this security risk should be given special attention by the community, changing the way that modern network architectures treat network printers and fax machines. From now on, a fax machine should be treated as a possible infiltration vector into the corporate network.
It uses a vulnerability in the firmware of the printer to allow a JPEG file to be received and saved in the memory of the printer, causing a stack-buffer overflow and allowing remote code execution. Similar to a vulnerability found in WinFax PRO viewer control disclosed in 2009, and reported here
Does this affect other models/makes of Fax Machines?
This research by CheckPoint was done on a HP Officejet Pro 6830 all-in-one ink printer with fax support. HP has confirmed this exploit is applicable to additional models of the HP ink-jet type printer with fax capability. It is possible that other manufacturers may use the same type of embedded software to control the fax hardware. In this case, the exploit may be possible on other fax devices that use similar embedded technology.
How to prevent this exploit:
Update your printer firmware as recommended by the manufacturer (You should do this as soon as possible)
If you are unable to update your firmware and are concerned about this exploit,
Disable Color Fax support in your All-in-one Printer.
Turn off Fax Auto-answer in your All-in-one Printer
Disable fax in your All-in-one Printer.
Disconnect the telephone line from your All-in-one Printer.
Note that these suggestions may only prevent remote execution of the fax exploit, it is possible a similar exploit exists with the document scanner so it is best to contact the manufacturer of your printer if it is not an HP Model.
GetFaxing.com provides a custom digitally signed automated installer for the MultiTech MT9234-MU-CDC-XR fax modem. The installer is compatible with Windows 10, Windows 2012 and 2008 Server, Windows 8.x and Windows 7. If you are using an older operating system, you must follow the manual installation methods provided with your fax modem.
Install using Driver Wizard for Microsoft Windows® 10, 8.x, 7, Server 2012/2008.
1. Download our custom driver package.
The download link is included within your completed order e-mail from GetFaxing.com. Look for the link “Modem Installer for Windows 10/8/7/Vista” or for the filename ModemInstallerForWindows.zip in your order e-mail.
If you have a GetFaxing.com account, you can also access your download links by logging into your GetFaxing.com account.
2. Locate the driver file you downloaded and extract the contents to a folder. The file you downloaded is in ZIP (Compressed) format. You must Unzip/Extract this file before you can install the modem driver. Right-click the file you downloaded, select Extract All. Use the default or choose a new destination folder. Click here for more information on using Unzip/Extract in Microsoft Windows.
After the unzip/extraction, the destination folder will include 2 files:
x64-MultiTech-MT9234MU-CDC-XR-64BIT.EXEand
x86-MultiTech-MT9234MU-CDC-XR.EXE.
To start the installation, Double-click on the appropriate modem installer file listed above for your specific installation of Windows. (x86 for 32-bit versions of Windows and x64 for 64-bit versions of Windows)
WINDOWS 10/8 NOTE:To determine which version of Windows you are using: Right-click the Start icon. Click System. Look for 32-bit or 64-bit to the right of the “System type” heading. Use the installer file x64-MultiTech-MT9234MU-CDC-XR-64BIT.EXE for 64-bit versions and x86-MultiTech-MT9234MU-CDC-XR.EXE for 32-bit versions.
3. Click Next to start the installation wizard. The installation wizard will prompt you when the MultiTech MT9234 fax modem driver is successfully installed.
When you use a high-DPI monitor or device such as a Surface Pro 3, Surface Pro 4, or Surface Book, you may experience elements in the FaxTalk applications, such as icons, toolbars, text and dialog boxes appear:
too small or too large when compared to the rest of the desktop
blurry text
incorrect font size when compared to the rest of the desktop.
In Explorer or on the Start menu, right-click the application name, select Properties, select the Compatibility tab, and then select the Disable display scaling on high DPI settings check box.
Note: In Windows 10 Version 1703 and later version of Windows, the text of the Disable display scaling on high DPI settings option is changed to Override high DPI scaling behavior, scaling performed by: System.
FaxTalk applications do not scale for DPI changes. They are always assumed to have a scale factor of 100 percent (96 DPI). The FaxTalk applications are automatically scaled by the system at any other DPI settings.
Recently we noticed that when you attempt to edit an existing WordPress page or post with the latest version of Google Chrome ( 77.0.3865.90 ), the (Gutenberg) Visual Editor would disappear behind some of the meta boxes (the meta boxes overlap the editor window). A quick solution for some quick edits is to disable the WordPress Visual Editor from your profile (From your dashboard see Users->Your Profile). Uncheck the Use Visual Editor option.
The meta boxes overlap problem appears to be common when you are using the plug-ins Yoast SEO and/or ACF. There have been reports of similar problems with the WordPress Visual Editor (Codename Gutenberg) since November 2018.
An elegant solution found on github is to add the following code in your WordPress theme “function.php” file
// Add style for dashboard, overlap meta boxes on posts(editor)
add_action('admin_head', 'custom_metabox_style');

function custom_metabox_style()
{
echo '<style>
.block-editor-writing-flow {
overflow: auto;}
</style>';
}
If this does not work, try replacing the code overflow: auto; to height: auto;
This code was referenced from this document on github and we’ve confirmed it is working. Please visit this link below for more details and/or updates on the above (temporary?) fix. Hope it helps.
When you perform a FaxTalk Fax Merge, the merged pages are processed sequentially and are transmitted to FaxTalk software one at a time. Each unique page that is processed could trigger an error if a faulty condition is raised. When this happens, the merge will not continue and the link between FaxTalk and Microsoft Word is broken.
Microsoft Word includes a mail merge simulation option that allows you to go through the steps of mail merge. Before you start a FaxTalk Fax Merge, we recommend performing this simulation to ensure that Fax Merge will complete. If you are presented with an error, your fax merge will fail. The error message should be sufficient to determine the cause of the problem.
You can start this simulation at anytime in Microsoft Word. To start the simulation, click the “Check for Errors” option in the Mailings ribbon tab. Choose the “Simulate the merge and report errors in a new document” option and click OK. If any errors are reported, a new document will be open with the error message(s)
The FaxTalk Fax Merge also has the ability to check for errors before performing the fax merge operation. In FaxTalk ribbon tab, click the Settings icon and the Fax Merge Tab. Enable the option “Auto check for merge errors prior to starting the merge”
Troubleshooting data source errors:
Do you have ASK , IF .. THEN .. ELSE, SKIP or any other rules in your mail merge? Double-check these fields.
Is the data source on your local drive? Are you sharing the data source on a network where someone else may be accessing it?
Is your matching correct? double-check your matched fields.
Try previewing the merge, turn on the Preview Results option in Mailings ribbon tab and scroll through each recipient. The page(s) should update with the correct merge fields filled in.
After updating Microsoft Windows 10 to release version 1903, you find that your voice modem disabled. Applications that use TAPI voice functionality are no longer functioning. Audio playback and recording to the voice modem no longer work.
Symptoms:
Software is not detecting the modem as a compatible voice modem (voice modem disabled, no wave device found) and no audio playback/recording functionality. Some non-voice functionality of the modem may continue to work (outgoing and incoming calls, caller ID detection, etc.)
Some affected TAPI voice applications include: Win-911 V7 & Win-911 Standard, CallStation, VTScada, VZEnhanced56K and Phone Eve.
NOTE: This problem does not apply to software that uses “TAPI passthrough mode” to communicate with the voice modem. FaxTalk uses pass through mode for voice functionality and is not affected by this issue.
To continue using the software, third party vendors are suggesting you roll back to the previous version of Windows 10.
Workaround Solution
This solution is provided by our friends at http://www.t38faxvoip.com/ and is provided as-is, with no warranty or liability. This is for version 1903 of Windows 10 only and allows you to continue using your voice modem in Windows 10 version 1903. Please only follow these instructions if you are comfortable editing the Windows registry.
This workaround involves adding a missing driver related registry entry, and requires rebooting your computer. You do not need to uninstall or remove your voice modem drivers.
To verify that your voice modem audio device has been detected in Windows 10:
From your Windows device manager, locate the “Sound, Video and Game Controllers” section. In this section, locate the “Unimodem Full Duplex Audio Device“, “Modem Audio Device” or “Unimodem Half Duplex Audio Device“.
In the device manager, you might see “Unimodem Half-duplex Audio Device” or “Modem Audio Device” instead of the one listed in this example.
NOTE: Click on “View, Show Hidden Devices” to display devices that are installed, but not currently active on the system.
2. Double-click the Unimodem Audio Device entry and verify that the location of this audio device is your voice/fax modem. If you have multiple modems, you may see more than one Modem Audio device listed.
The location listed for this Unimodem Full-Duplex Audio Device is the Conexant USB CX93010 ACF Fax Voice Modem (Our GetFaxing.com Modem)
3. Using regedit, locate the following registry key:
In the Drivers32 key, locate all keys listed with “Wave#”. For example, “Wave”, “Wave1” , “Wave2” etc. Determine the last “Wave#” key value that exists. If you only have “Wave” listed here, then create a new string value named “Wave2” with the string data “serwvdrv.dll“. If you have multiple keys that exist such as “Wave”, “Wave1”, “Wave2”, then add the the next available new string value. For example, “Wave3” with the string data “serwvdrv.dll“
In this example we created a new key named “wave2” with a string value of “serwvdrv.dll” because an entry “wave” already exists with a different value.
4. If you are using a 64-bit Windows 10 – version 1903, you must repeat step 3 for using the following key:
Note: If the Drivers32 key doesn’t exist in WOW6432Node\Microsoft\Windows NT\CurrentVersion, then you are using a 32-bit version of Windows 10. Skip this step and go to Step 5.
5. Restart Windows.
The voice/fax modem will now work for recording and playback, using any compatible TAPI application.
Acknowledgments:
Thanks to T38FaxVoip.com for troubleshooting and finding a solution and Eric Kutcher for his additional help.
You updated your Microsoft Office 2016 to version 1910 build 12130.20272 (October 30th, 2019) or later and use the Fax Merge to send e-mail from FaxTalk. When merging, you may see the error “It appears the fax number field you selected contains email addresses. You must configure FaxTalk to send email before you can continue the merge“. Alternatively, when attempting to send merged faxes, recipients containing an e-mail address are skipped when merged.
We have determined the cause of this problem is due to a change of behavior of a command used within the Microsoft Word Visual Basic for Applications (VBA) environment.
You can downgrade your Microsoft Office 2016 to the last working release version 1909 build 12026.20344 dated October 22, 2019.
More information on reverting to an earlier version of Office 2016.
How to install the GetFaxing Fax Voice Modem Driver.
For CallClerk Caller ID software to play and record audio you will require to install the GetFaxing.com Fax Voice Modem Drivers.
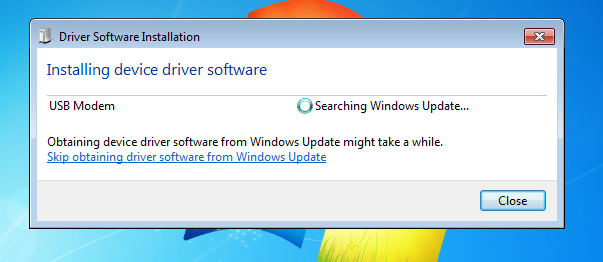
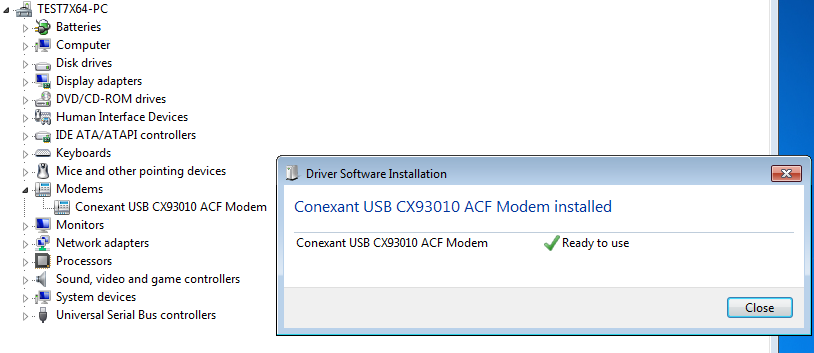
Insert the GetFaxing.com Conexant USB Modem into an available USB port. For first time installations, Windows will automatically install the Windows default plug & play modem “Conexant USB CX93010 ACF Modem“.
When you first insert the fax voice modem into a new computer, Windows will attempt to search for drivers via Windows Update and local folders. The default modem will be installed as Conexant USB CX93010. Shown is the Windows 7 dialog box. This process could take several minutes and an animated icon will appear in your system tray during this process. When completed, Windows will display a Driver Software Installation message that the Conexant USB CX93010 ACF Modem or a similar modem name is ready to use. The Windows 7 screen is shown in the image.
This Windows default modem driver is acceptable for many TAPI fax and voice software that uses TAPI pass-through mode, but for some voice software that uses TAPI only mode you will require an additional step to install the GetFaxing.com Modem Drivers.
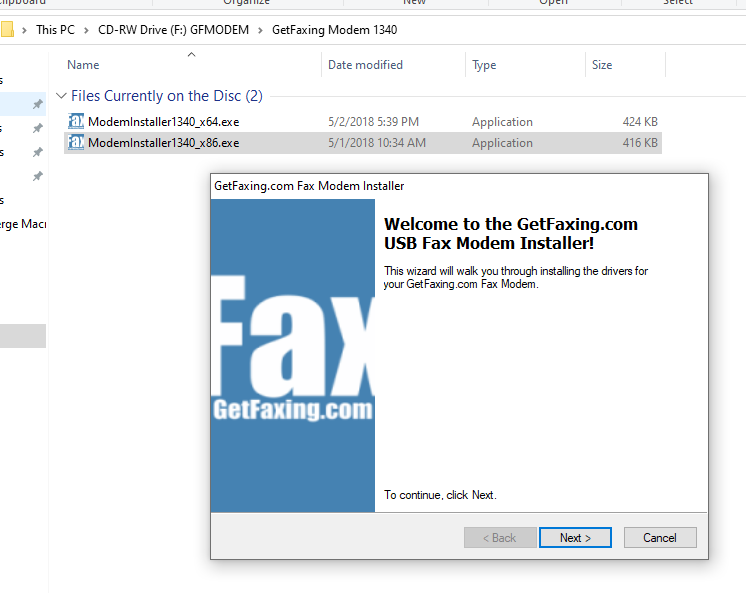
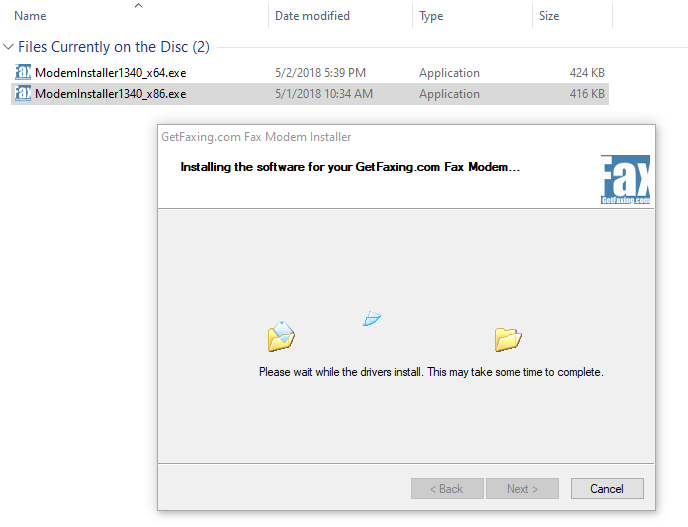
Start the GetFaxing.com modem installation wizard by double clicking the executable file for your operating system. For Windows 10, Windows 8.x and Windows 7 (SP1 plus latest SHA-2 updates) modem installation wizard files are:
ModemInstaller-x64.exe for 64-bit Windows 10, 8.x, 7 machines ModemInstaller-x86.exe for 32-bit Windows 10, 8,x, 7 machines
NOTE: We recommend you download the drivers from the link provided to you from your original order e-mail. Some shipments of modems will also include a CD with a GetFaxing Modem folder. If this folder is not present on your installation CD, download the files from the link included with your order e-mail.
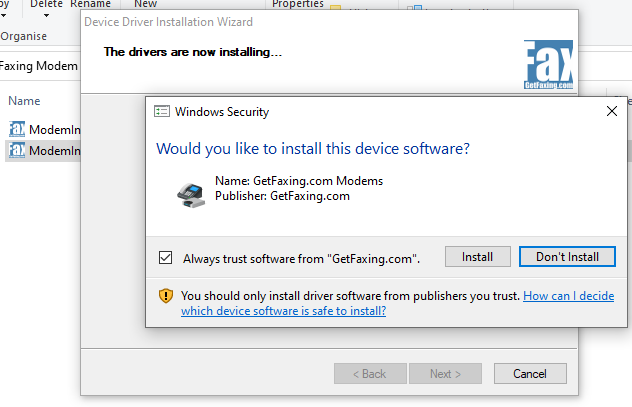
You are prompted with a User Account Control dialog box (Windows 7 dialog shown in image) when you start the ModemInstaller-x64.exe or ModemInstaller-x86.exe file. This dialog box should always show the verified publisher as GetFaxing.com.
NOTE: The software installation file is digitally signed with SHA-2 digest algorithm using a GetFaxing.com certificate. Your operating system must support SHA-2 (also commonly referred as SHA256) to successfully verify the publisher as GetFaxing.com. Windows 7, by default, does not fully support SHA-2 without updates. If the software appears to be unsigned, then following may be true a) you do not have all installed operating system updates to support SHA-2, or (b) your machine does not have updated root certificates to recognize the SHA-2 digest. To update the root certificate, try viewing the Properties of the installation file, click the Digital Signatures Tab, select GetFaxing.com from the signatures list, click the Details button. If the digital signature appears valid and is signed by GetFaxing.com, try installing again.
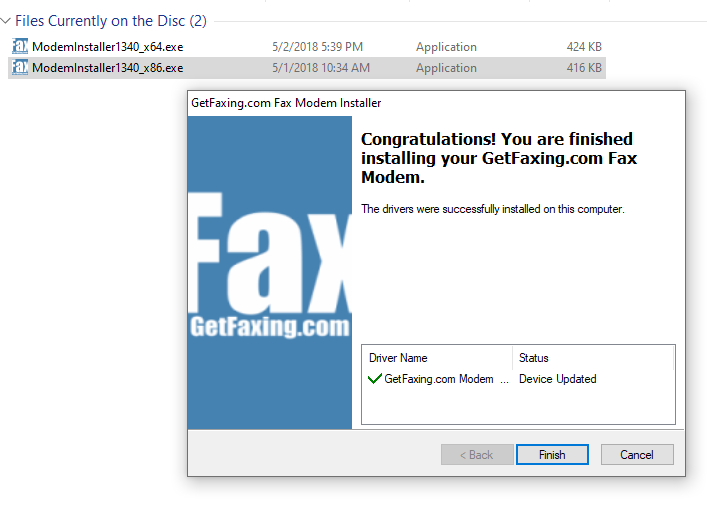
Click Next to walk through the GetFaxing.com USB Fax Modem Installer Wizard. Windows will prompt you if you would like to install the device software. This is a Windows Security dialog box that verifies that driver software is signed digitally by GetFaxing.com. Click Install to continue. Windows will now attempt the installation of the modem drivers. This may take a few minutes. If successful, you will see this message. If no update was required, you will see a message that the device has the latest driver installed. Click Finish to close the Installer Wizard.
The modem name will now appear in Windows as a Conexant USB CX93010 ACF Fax Voice Modem after a successful installation. This modem name differs from the default modem installed by Windows; Conexant USB CX93010 ACF Modem.
Please reboot the machine after installation of the fax voice modem drivers.
Windows 10 considerations.
It is recommended to use the latest version of Windows 10, however, this may not be possible when using an older unsupported machine or a machine that is not connected to the internet. Windows 10 has a number of different versions, and you should be aware of which version you are using. There are known problems with some versions of Windows when using a voice modem. We have included information on the known issues, and the solutions/workarounds below.
NOTE: You can verify your version of Windows 10 by right-clicking Windows Start, Click Run, and type ‘WinVer’ (Or Windows Key+R and type WinVer and press Enter)
Windows 10 Version 1903 and 1909 will require “serwvdrv.dll” registry fix.
Versions 1903 and 1909 Windows 10 have a problem specific with voice modems playback and recording. Microsoft was notified of this problem and they corrected the issue with the release of version 2004. If this version is available for your device, we recommend you update.
A workaround fix is available if you are using version 1903 and 1909. More information about this fix and instructions are provided here.
Windows 10 Version 1511 requires update.
Version 1511 Windows 10 introduced a problem where the Unimodem full duplex or half duplex audio driver would not install with the voice modem. If you are using this version, you should update to Version 1607 or later. More information and a workaround fix for Version 1511 is available here
Windows 7 requirements.
If you are using Windows 7, ensure you have all the latest security updates to support SHA-2 signing before attempting to install the modem drivers. If you attempt to install the drivers without SHA-2 support in the operating system, the installation files will not be detected as digitally signed and they will be blocked from installing.
NOTE: Legacy OS versions (Windows 7 SP1, Windows Server 2008 R2 SP1 and Windows Server 2008 SP2) are required to have SHA-2 code signing support installed on their devices to install updates released on or after July 2019. Any devices without SHA-2 support will not be able to install Windows updates on or after July 2019.
You can verify if your operating system is updated to support SHA-2 by right-clicking the Modem Installer exe file. Click Properties, click the Digital Signatures tab. Select GetFaxing.com from the signature list and Click the Details button. This will verify the digital signature, update the root certificate and confirm your system will support SHA-2.
Stand Alone security updates KB4474419 and KB4490628 released to introduce SHA-2 code sign support.
Troubleshooting the Modem.
Remove all previous fax modem drivers.
If you are replacing a modem, you should uninstall any software drivers for that modem. Multiple fax modem drivers from different models of fax modems can cause unreliable and unstable results in Windows. Check the Add/Remove Apps, Add Remove Programs and Device Manager to remove specific fax modem drivers that are no longer being used. Once you’ve done this, check the Device Manager to view and uninstall orphaned modem drivers.
To open the Device Manager in Windows.
Open the “Run” dialog box by pressing and holding the Windows icon key, then press the R key (“Run”). In the open prompt, type devmgmt.msc and Click OK.
NOTE: In Windows 10 you can right-click the Windows icon on the desktop and select “Device Manager” from the pop-up window to open the Device Manager.
In Device Manager, click View, Devices By Type. (make sure there is a check mark). Click on View, Show Hidden Devices (make sure there is a check mark ) Click on Modems. Right click on the specific modem in the list and click Uninstall. If you no longer will use this modem you should check the option to remove the driver files.
Disable other application(s) that may use the modem.
Some modem applications may conflict with proper operation of CallClerk. Disable and make sure other applications are not operational.
CallClerk is a TAPI application that should allowing sharing with other TAPI compatible software, but some software may take priority of the modem and prevent CallClerk from answering or detecting an incoming call.
Insert modem to a direct USB port.
USB hubs or extensions may cause communication problems. Install the USB Modem directly to a USB 3.0, 2.0 or 1.1 port on the computer. Recommended is a USB 2.0 or 1.1 port.
Troubleshooting Call Clerk
Adjusting the volume.
CallClerk does not have a recording volume control setting, but you can adjust the recording gain of the voice modem by setting the +VGR= value. If you find that recordings from your callers are too low when played back, you can increase the +VGR value accordingly. Values are 0-255. Default value is 128 which is the normal gain value.
The volume level for the incoming caller is the transmitted playback. If your transmitted playback volume is too low or too high, you can adjust using the +VGT= value. Values are 0-255, but recommended values are between 120 – 136. Default value is 128 which is the normal playback gain value.
Since +VGR= and +VGT= are voice commands, you must be in Voice Mode before this command can be sent to the modem. The +FCLASS=8 command sets the modem to voice mode and must be sent to the modem before the +VGR= or +VGT= value. To avoid problems with other software expecting the initial state of the modem to be data, we set the modem back to the default class with a +FCLASS=0 command. To ensure Caller ID remains enabled, we set +VCID=1
Here is an example of Extra Initialization command:
You can add this to the Extra Initialization command within Phone & Modem Properties. Click the Advanced Tab (next to Diagnostics) to enter the Extra Initialization command line. If you are unable to change this, click on the General Tab and click the Change Settings button.
Command breakdown
Note: Multiple modem commands are included a single line, and each command is separated by a semi-colon.
ATE0 = Attention modem command followed by Echo off.
+FCLASS=8 = Set modem to voice class mode
+VGR=255 = Set recording gain to highest value (255)
+VGT=128 = Set the playback gain to default value (128)
+FCLASS=0 = Set modem to default class mode.
+VCID=1 = Turn on Caller ID.
Register your trial account with T38Fax.com to receive your $25.00 US$ Credit and 30 Day Free Trial. Local Fax Numbers (DIDs) are available within area codes within the United States only. If you are located in another country, you can still use this service but are limited to a local United States fax number. You can send faxes to United States, Canada and Puerto Rico. After setting up your account, T38Fax.com will send you the account details that will contain the information required to setup FaxTalk.
Enable T.38 Fax in FaxTalk.
FaxTalk FaxCenter Pro 10, FaxTalk Multiline Server 10 and FaxTalk Messenger Pro 10 now are T.38 internet fax compatible. If you have FaxTalk Multiline Server 10, you can enable multiple connections and use a combination of up to 8 fax modems and t.38 fax service providers. FaxTalk FaxCenter Pro 10 and FaxTalk Messenger Pro 10 will only allow one type of connection.
NOTE: If you use a fax modem with FaxTalk FaxCenter Pro 10 or FaxTalk Messenger Pro 10, it will be replaced by the t38fax.com service.
In FaxTalk, Click on the Tools menu, click Options. Click Connection. Select the device on the list you wish to change, click Change. Change the drop down menu selection to “Select a T.38 Internet Fax connection“. Type a name of this connection in the Name field, for example you could enter “T38Fax.com” or your account/fax number. Click Next. FaxTalk will now check and verify your LAN/Internet connection. Click Finish.
Configure your T38Fax.com account in FaxTalk.
You should now see the connection name you entered above, with the status Enabled. Select this connection name and click Properties. You will need the account information provided by T38Fax.com to continue.
The Connection Properties dialog box should now appear.
Local IP connections settings dialog for T.38 Fax setup.
In the Local IP Settings Tab.
Check Use SIP and set Port 5060 (Default) Use H.323 (unchecked/disabled) Port: 1720 (Default) STUN Server: Not used, leave blank. Additional Options: Leave blank unless otherwise requested to add parameters by technical support. Use this connection for “Sending and Receiving”, “Sending Only”, or “Receiving Only”. Select your preferred option. Port Range for RTP: 5000 To 5200 (Default) IP Address: Leave blank.
Remote IP connection settings dialog for T.38 Fax Setup
In the Remote IP Settings Tab.
Host name or IP address: Here you enter the host name or IP address for the remote T.38 fax server. Enter sip.t38fax.com
Port: Enter the port number for the remote T.38 fax server. For T38Fax.com the port number is 5060
Use SIP: Enable this option to use the SIP protocol to T.38 fax operations.
Username: Your T38Fax.com user name is your fax number in 11 digit format. example: 17074402708 Enter the username of your T.38 fax service provider account here.
Password: Enter the password of your T.38 fax service provider account.
Registration expiration period: 300. Sets the period of time, in seconds before the SIP or H.323 registration expires and re-registration occurs to remain active. Your T.38 fax service provider may provide a specific expiration period used by their service. The default value here is 300 (seconds)
Maximum number of simultaneous connections: T38Fax.com supports multiple simultaneous connections for fax operations with your account. A total of 2 connections for the trial account/basic account is provided. The number of simultaneous connections is determined by your T.38 fax service provider based on their plan offerings.
Send redundant fax data – Enable this option to send the previous data packet along with the next data packet to ensure there is no data loss during transmission. Having this option enabled does add additional overhead to the data transfer process when sending faxes.
Proxy Server – You can leave this blank unless the provider indicated that a proxy server is used/required.
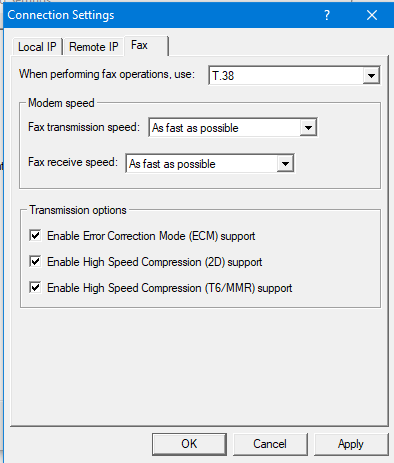
Fax Connections Settings Dialog for T.38 fax setup.
In the Fax Settings Tab.
When performing fax operations, use: T.38 Fax Specifies the Internet fax standard FaxTalk should use when performing fax operations. Default is T.38 Fax.
Fax transmission speed: Specifies the maximum speed at which you want to transmit faxes. The maximum speed for T.38 fax is 14,400 bps.
Fax receive speed: Specifies the maximum speed at which you want to receive faxes .The maximum speed for T.38 fax is 14,400 bps.
Note: Normally you would want to send and receive faxes at the highest speed possible but in some cases you may encounter a fax machine that has problems sending or receiving faxes at high speed and you’ll need to lower the speed to properly receive the fax.
Transmission options
Enable Error Correction Mode (ECM) support – Enable this option to use Error Correction Mode (ECM) when sending or receiving faxes.
Note: Error Correction Mode provides a more reliable fax transmission by verifying the data received is the same as the data sent.
Enable High Speed Compression (2D) support – Enable this option to use high-speed compression (also referred to as MR or G3-2D encoding) when sending or receiving faxes.
Note: Using 2D compression will result in significantly reduced transmission times since the data being transmitted is compressed. In some cases, you may find that some fax machines have problems receiving faxes when 2D compression is enabled.
Enable High Speed Compressions (T6/MMR) support – Enable this option to use CCITT Group 4 compression, also referred to as G4 or Modified Modified READ (MMR) defined in the ITU-T T.6 fax standard. Provides more advanced compression compared to the Group 3 MH and MR compression formats.